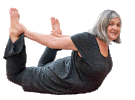
Aligned Sun Salute
My initial contact with yoga can best be described as an experience similar to listening to a foreign song; the music struck a cord but there is no actual understanding of the words. I have a few French songs I like to listen to, I love them, I listen to them over and over with no idea what they mean. In the same way my body responds to yoga asanas, yoga practice makes me feel good, happy even, but I could not really tell why this is the case.
I discovered yoga in 1998, I loved yoga, I started doing lots of it (embarrassing amounts really), I started teaching yoga. Instead of the "I am home feeling" my body was giving me hints that something was not exactly as it should be - there were whispers of discomfort in my low back, a stern rebuke, sometimes a scream from my right hip. Why did this happen? Yoga was supposed to be good for me. I read books and blogs and asked other teachers, I made some educated guesses, but could never tell with certainty what I was doing wrong or even exactly what I was doing right.
Should I take the chance and translate the song, what if I don’t like the meaning? What if I diminish the mystery surrounding my practice.
The spiritual adept James Swartz says, what you feel is enhanced by understanding. In my search for deeper insight I stepped clear off the yoga path into the world of alignment as set out by Katy Bowman. I found a system that respects the body's soft tissue physics. Alignment through 25 bony markers for optimal function allows me to practice and teach yoga asana safely with healthful results. These markers are the same for everyone, really everyone, even you! When the body is in alignment one plus one is always going to be two. No more hip pain no, more back issues.
Here is how Katy outlines the 25 alignment points.
With this knowledge of how your machine is supposed to work, lets add some words (and pictures) to the music that is the Sun Salute.
Tadasana (mountain pose)
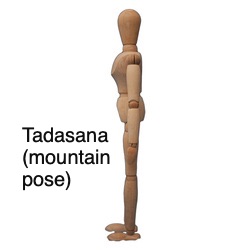
Optimal health requires correct joint mobility which in turn requires correct muscle lengths. From an alignment perspective the mountain pose is very helpful to access your current muscle lengths.
Standing in correct alignment is not as easy as you might think. As with all yoga it is a tool of self inquiry, not a measure of your self worth. Your current muscle lengths is the result of lifelong habits and moving in non-natural ways. So just do the best you can.
Build it from the bottom up!
Looking at yourself from the front, allow your feet to face forward parallel outside edges, pelvic width apart. To get a feeling for how this looks you can line your feet against a yoga block or a book. It is OK if you end up a little pigeon toed. Feet placed pelvic width apart will set your hip bones over the middle of the knees and the middle of the knees inline with the middle of the ankles. When you place your ankles hip distance apart it places the long bone of the leg (femur) in a vertical position.
You want your weight back in your heels so that you can lift your toes off the floor. If you take a sideways glance into a mirror you are trying to line your ankle bone, knee, hip bone, shoulder and ear on a plumb line.
Bring your pelvis into neutral. This means that your hip bones (ASIS points) align vertically in the same plain as your pubic symphysis. Now drop your ribs allow the bottommost ribs to align to their own ASIS points. You should not be able to get your fingers around the bottom part of your ribcage. For more clarification here is a nice Katy blog to show you how it is done http://www.katysays.com/rua-rib-thruster/
What is happening up top? Allow your arms to hang straight next to your body with elbow pits and thumbs turned forward. Keep your shoulder blades (scapula) away from one another you should not be able to see andy bony edges, no angel wings here!
Uttanasana (forward bend)
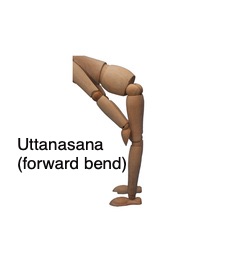
Give the work to the back of the legs!
As you bend forward back up!
Bend forward, stop at the point where your hamstrings no longer allow movement. You might be surprised at how short your hamstrings are. Your pelvis range of motion is going to be limited by your hamstring length. Your torso which stays inline with your pelvis needs to stop moving when your pelvis stops moving. Why? When the hips stop moving any additional work is done by the spine. If you respect your current hamstring length, you avoid over lengthening the muscles of the spine, which weakens the spinal discs. Be sure to keep the legs straight, as this is another way that you can take the work away the hamstrings and give it to the spine. Give your spine (more particularly your spinal extensors) a break already!
Only tip forward from the pelvis. Maintain a lumbar curve. Lift your tailbone. The weight of your body is towards the heels spread your toes if you can! Say, " I don't need to touch the floor" and one more time with some meaning " I don't have to touch the floor!"
Done this way the forward bend respects your current muscular boundaries.
Uttihita Chaturanga Dandasana (plank pose)
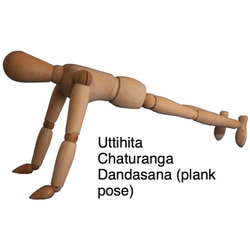
From standing step back to bring the right knee to the floor (alternate legs on following round). Come to all fours. Bring your shoulder over your wrists. Spread your fingers nice and wide making and L shapes between your middle fingers and your thumbs. Make sure your fingers are pointing to the top of your yoga mat. The elbow creases are facing the same direction as you fingers. Push the floor away from you, remove the valley between the shoulder blades.
If this is hard then this is it for you until you build some strength.
If you can keep the shoulder blades wide (protracted) with some ease then it is time to step back so your body resembles a plank. Your butt and lower back are relaxed. Make sure that your ribs are up away from the floor to allow you core to engage.
If your elbows are pushed out in front of your wrists and shoulders, then you are holding your body weight with the ligaments of the elbows. To correct this and avoid damage to the joints, put a slight bend in the elbows to allow for optimal muscular activation of the shoulders.
Adho Mukha Svanasana (downward facing dog pose)
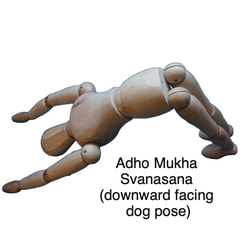
From plank move straight to down dog.
Don’t be tempted to move your hands and feet. You want to create a ninety degree angle at the hips, coming straight form plank to down dog gets you right where you need to be!
Tight hamstrings will run you into trouble here pulling you out of a neutral pelvis. To correct this, bend at the knees and lift your sit bones remove any flexion at the spine. Bend your knees enough to bring your wrist your ears your shoulders and your hips into one line.
Your fingers look just like they did in plank pose, wide with parallel middle fingers and thumbs pointing (or trying to) point to each other. Elbow creases face forward, this is a hard instruction for people with very internally rotated shoulders, you can modify by doing down dog from your forearms with palms facing up.
Bhujangasana (cobra pose)
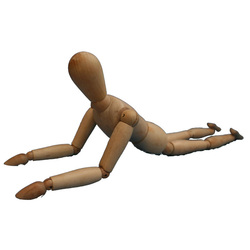
From the down dog come to all fours and bring the body-weight forward drawing the elbows towards each other. Allow the elbows to support the ribcage and bring the body to the floor. Extend the legs, keep the legs pelvic width apart and the pubic bone on the floor.
Lie face down palms flat placed in line with your shoulders.
Modify, face your palms up if you are unable to keep your shoulders down and away from your ears.
Slowly start to lift the chest. Bring your upper body off the floor, allow the back muscles to do the work, the arms do very little. Relax your head. Reach for an imaginary object with your toes. Keep the legs straight and active. Try to keep the pinky toe side of your foot on the floor.
What happens on the front of the body is also important in this pose. Keeping the ribs from thrusting will allow you better access to your abdominal muscles and better extension through the entire spine. When you are rib thrusting you are more likely to shorten up your lower back muscles and increases lumbar disk compression. This is exactly what you do not want in your cobra pose. The lumbar curve relies on the correct relationship between the pelvis and ribcage. So keep those ribs in and down.
Making it easier. When learning this pose keep it low, don't try to lift to high. To simplify it further start with your forearms on the floor in front of you. (see the little stick man above).
To finish bring your forehead to the floor and then push up onto hands and knees.
To Finish... from hands and knees complete steps 1-5
Repeat leading with the left leg.
